
 Facebook
 X
X
 Pinterest
 Copy Link
By Dana Gutwein A behind-the-scenes look at how strategic updates, a trusted contractor network, and full-service project management helped one Lakewood homeowner maximize their sale price – without ever having to meet a contractor themselves. 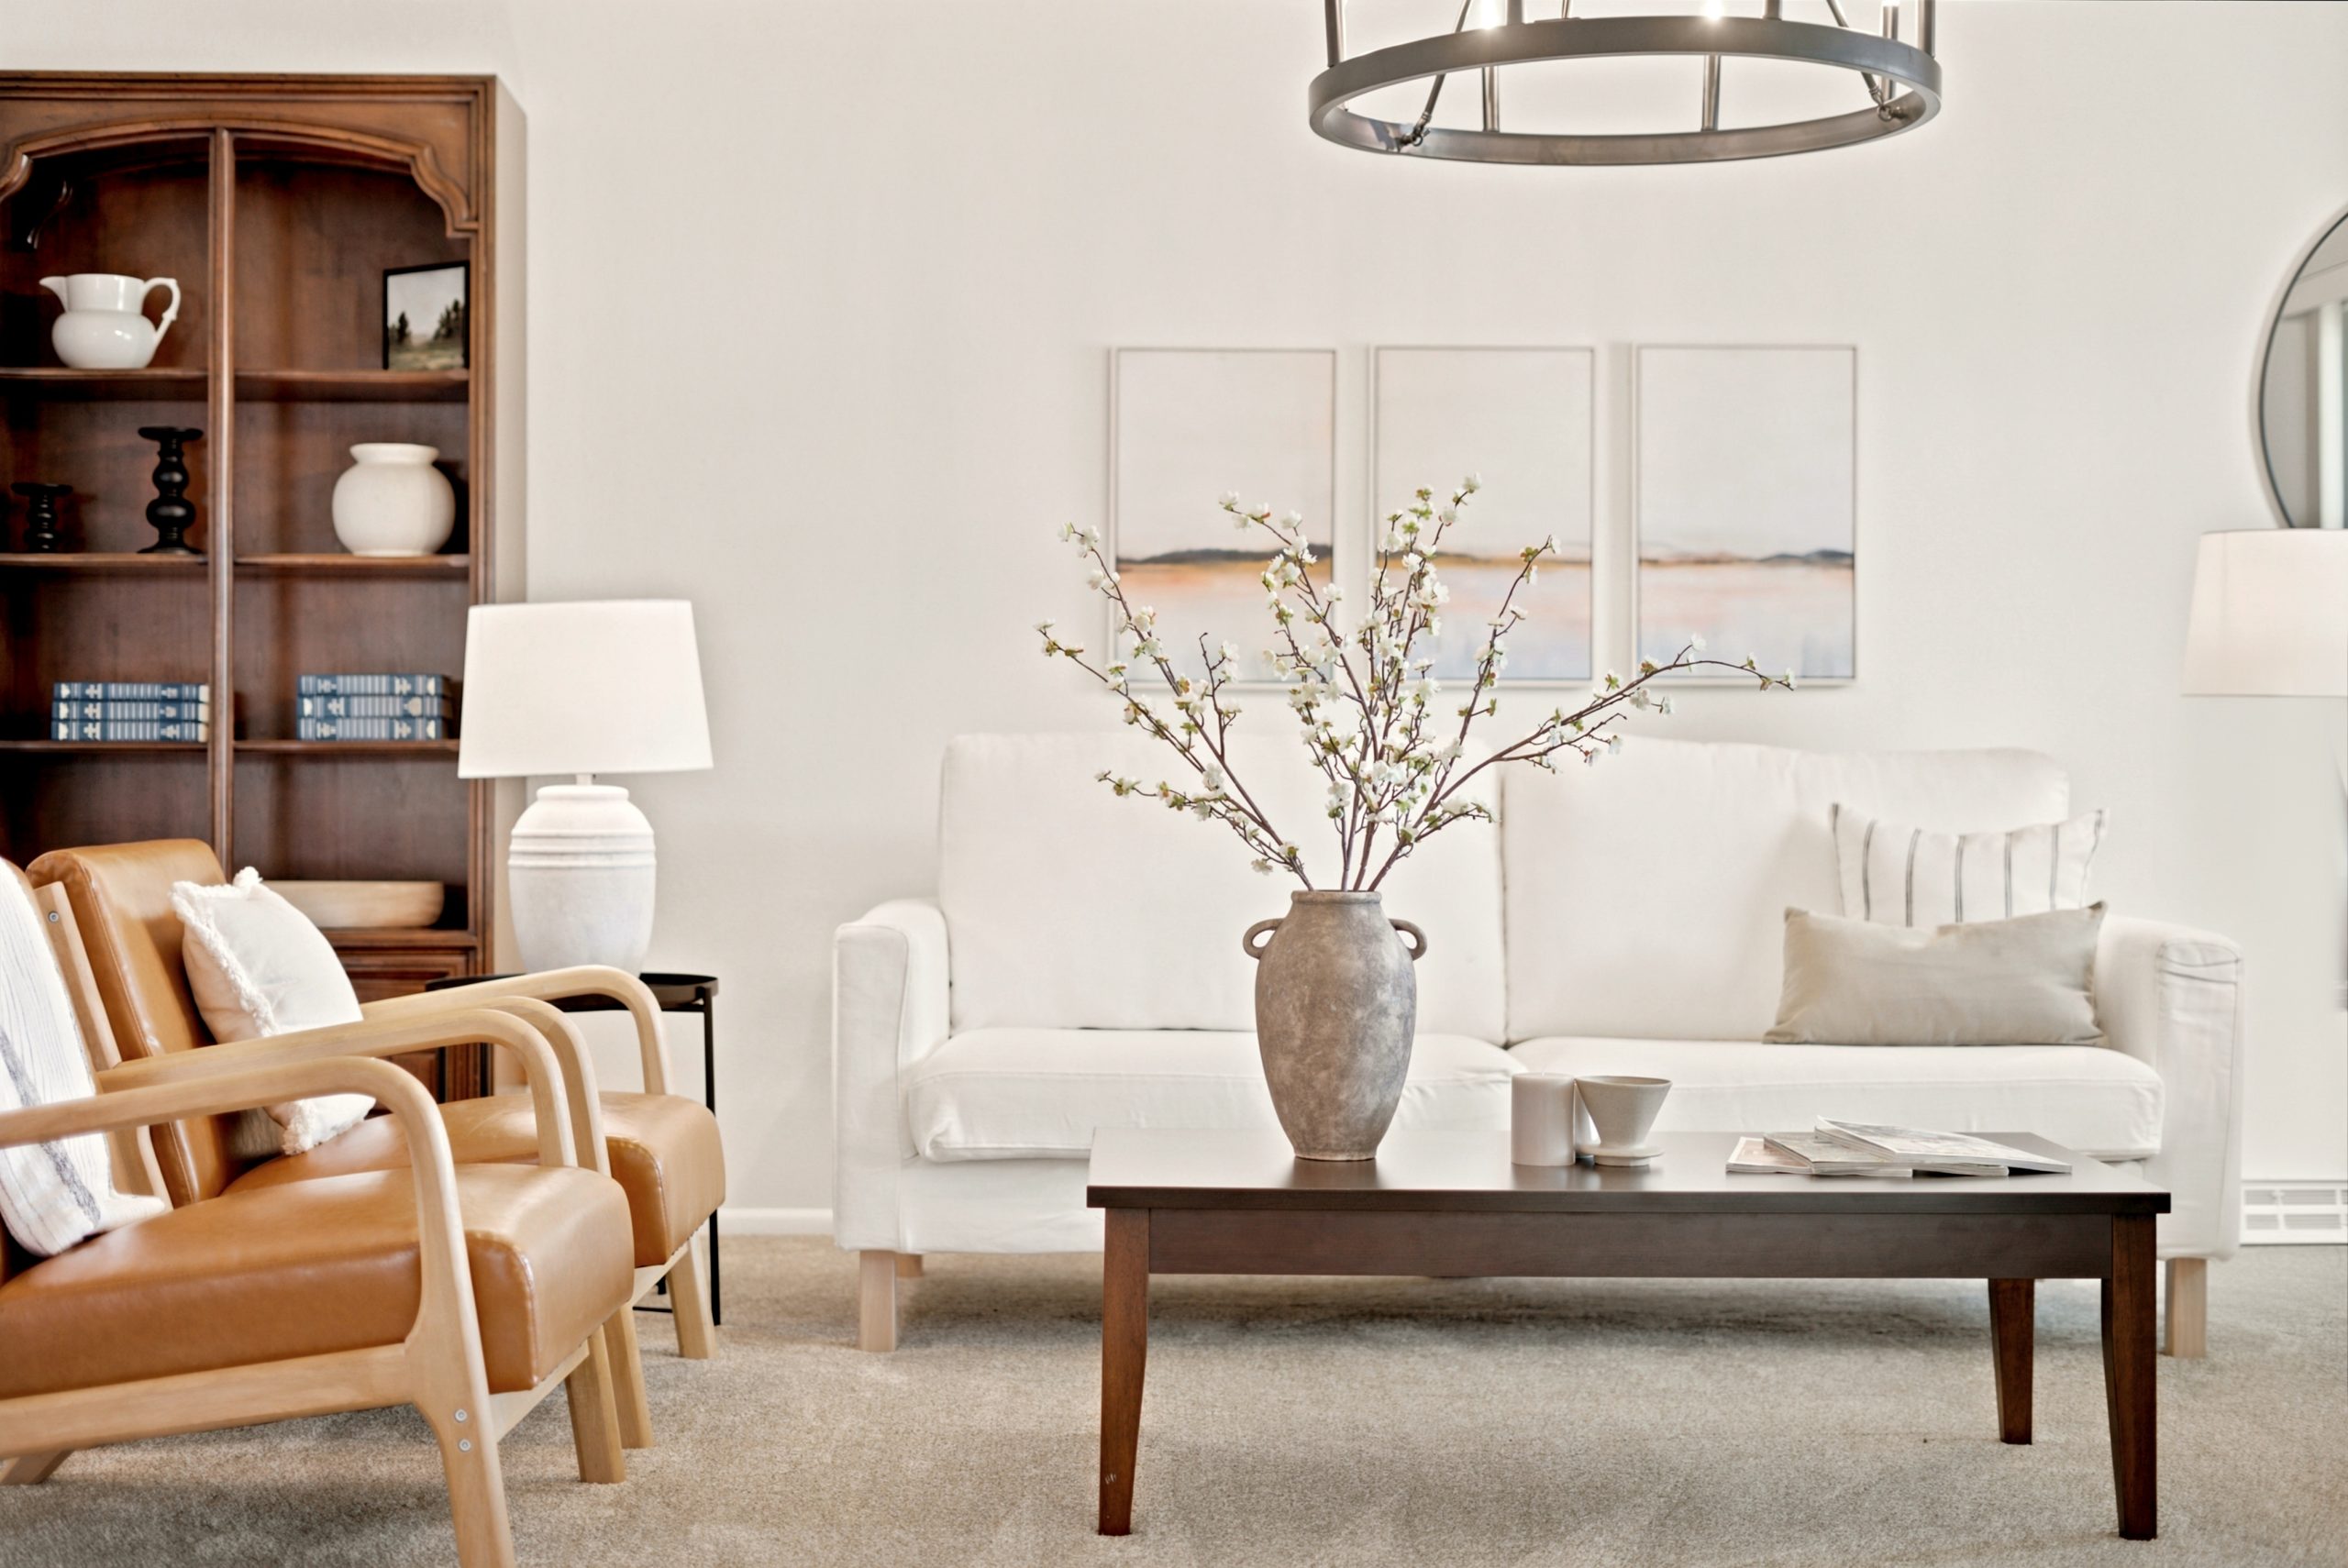 Flippers know the playbook: make strategic updates, then sell for maximum profit. What if you could run that playbook on your own home?
That’s where we come in.
I’m Dana – my background is a mix of engineering, neuroscience, marketing, real estate, community work, project management, design and IT. Strange mix, I know. But, these experiences have uniquely positioned me to help people achieve their goals during their home sale.
I’ve had an eye for art and design since I was a kid rearranging furniture in my own room, and I owe most of what I actually know to the people who taught me: my mom, a nurse, who always loved real estate and had an incredible talent for tackling fixer uppers and ultimately selling for a profit, skills she learned from her dad in construction; and my artistic mother-in-law, who has continued my DIY education – on everything from chalk paint to sewing. Somewhere along the way that turned me into the person friends and family call for layout and design advice, now, I bring that eye and experience to every finish, every paint color, and staging selection you’ll see in this post.
Additionally, I’ve used my engineering and IT background to use AI to build a tool that helps us analyze the lift and ROI of potential improvements for homeowners, so our clients can make strategic investments with the best odds of a real return. We were able to put all of this to work on a recent project, and it’s a great example of how we got real results for our client. Let’s go through it.
At a Glance
- Investment: ~$15K in strategic updates
- Price Lift: ~$60K above as-is value*
- Net Return: ~$44K (about a 275% ROI)*
- Prep Timeline: 10 days from funding to work completed, fully staged
- Time to Offer: Multiple offers within 3 days of hitting the market
- Time to Close: 10 days from accepted offer to closing
*See the disclaimer below – every property and market is different, and individual results will vary.
Step One: Taking Inventory
The first step is taking inventory – the current state of the home, and the current state of the hyperlocal market, both the last three to six months and current inventory. Where does the home stand? How does its condition compare to others nearby? What updates does it have? What are its greatest features? What features might be holding it back? Where’s the greatest opportunity for improvement? And just as important: how much budget, if any, does the homeowner have for improvements? In this case, our clients wanted to sell at a certain price point and were able to invest about $15K to get there. After comparing the home to the market, we thought the biggest assets were its location – in a beloved, established Lakewood neighborhood with tree-lined streets and an easy walk to parks and local amenities – plus the updated kitchen and bathrooms, the wood floors, and the mature trees, flower beds, and spacious backyard. Some parts of the home were original to its 1970s build, and others displayed normal wear and tear. This meant we had room to increase our price per square foot with strategic improvements, and help our clients land where they wanted.
Building the Strategy
From there, I mapped out a series of possible improvement strategies, gathered quotes from LaDawn’s list of trusted, vetted contractors, and, using our AI tool, built out a few different scenarios for our clients to compare – for example, updating the upstairs and downstairs together versus updating the upstairs only.
Beyond the cost of updates, we also have to weigh the timeline and the potential for the unexpected. In this case – and in most – time mattered. Nobody wants extra months of mortgage payments and utilities while a remodel drags on. When I think about complexity and uncertainty, I’m really thinking about risk. For example, on paper, removing popcorn ceiling can be a great return on investment, but it carries risk – for example, it may damage the ceiling and require texture, adding cost and time. A fresh coat of paint, on the other hand, is about as low-risk as it gets.
It’s invaluable to bounce all of this around with LaDawn and the rest of her team. LaDawn brings 12 years of real estate experience in this exact market, and she always has her finger on the pulse of what buyers are noticing, what they care about most, and what’s actually a deal-breaker versus a non-issue. Between her market read, contractor relationships, negotiation expertise and her in house marketing expert that carries a listing across the finish line, our clients get a full team working toward one goal. In the end, our clients chose to move forward with updating both the upstairs and downstairs.
Here’s a look at the before-and-afters, along with the work done in each room and why. I handled scheduling and oversight for all of it – everything from selecting fixtures to paint colors to meeting contractors onsite to verifying work was complete on time.
From the day our clients were ready to move forward with funding to the day all the work and staging were complete took just 10 days.
Because we work with a trusted group of contractors we already know and rely on, I was able to manage every appointment and decision on our clients’ behalf – a nice convenience that meant they never had to coordinate a single meeting themselves.
Results
In the end, based on current market data, this home sold for approximately $60K more than it would have in as-is condition – seeing approximately a $44K net return on their investment, for an estimated 275% ROI.
Keep in mind, staging and remodeling are only one piece of the puzzle. Thanks to marketing, skilled negotiation, professional photography, and more, this home received multiple offers within 3 days of hitting the market – and closed just 10 days after the offer was accepted.
Disclaimer
It’s worth noting that while we analyze a significant amount of data to build these estimates, it’s still an estimate. Like most investments – and honestly, most of real estate – there’s no guarantee. We can’t promise a particular outcome, but we can give you the tools and information to make informed decisions and set you up for success. These are the results we saw on this particular home; we can’t guarantee the same result on a different property in a market that’s ever evolving.
Kitchen Before / After
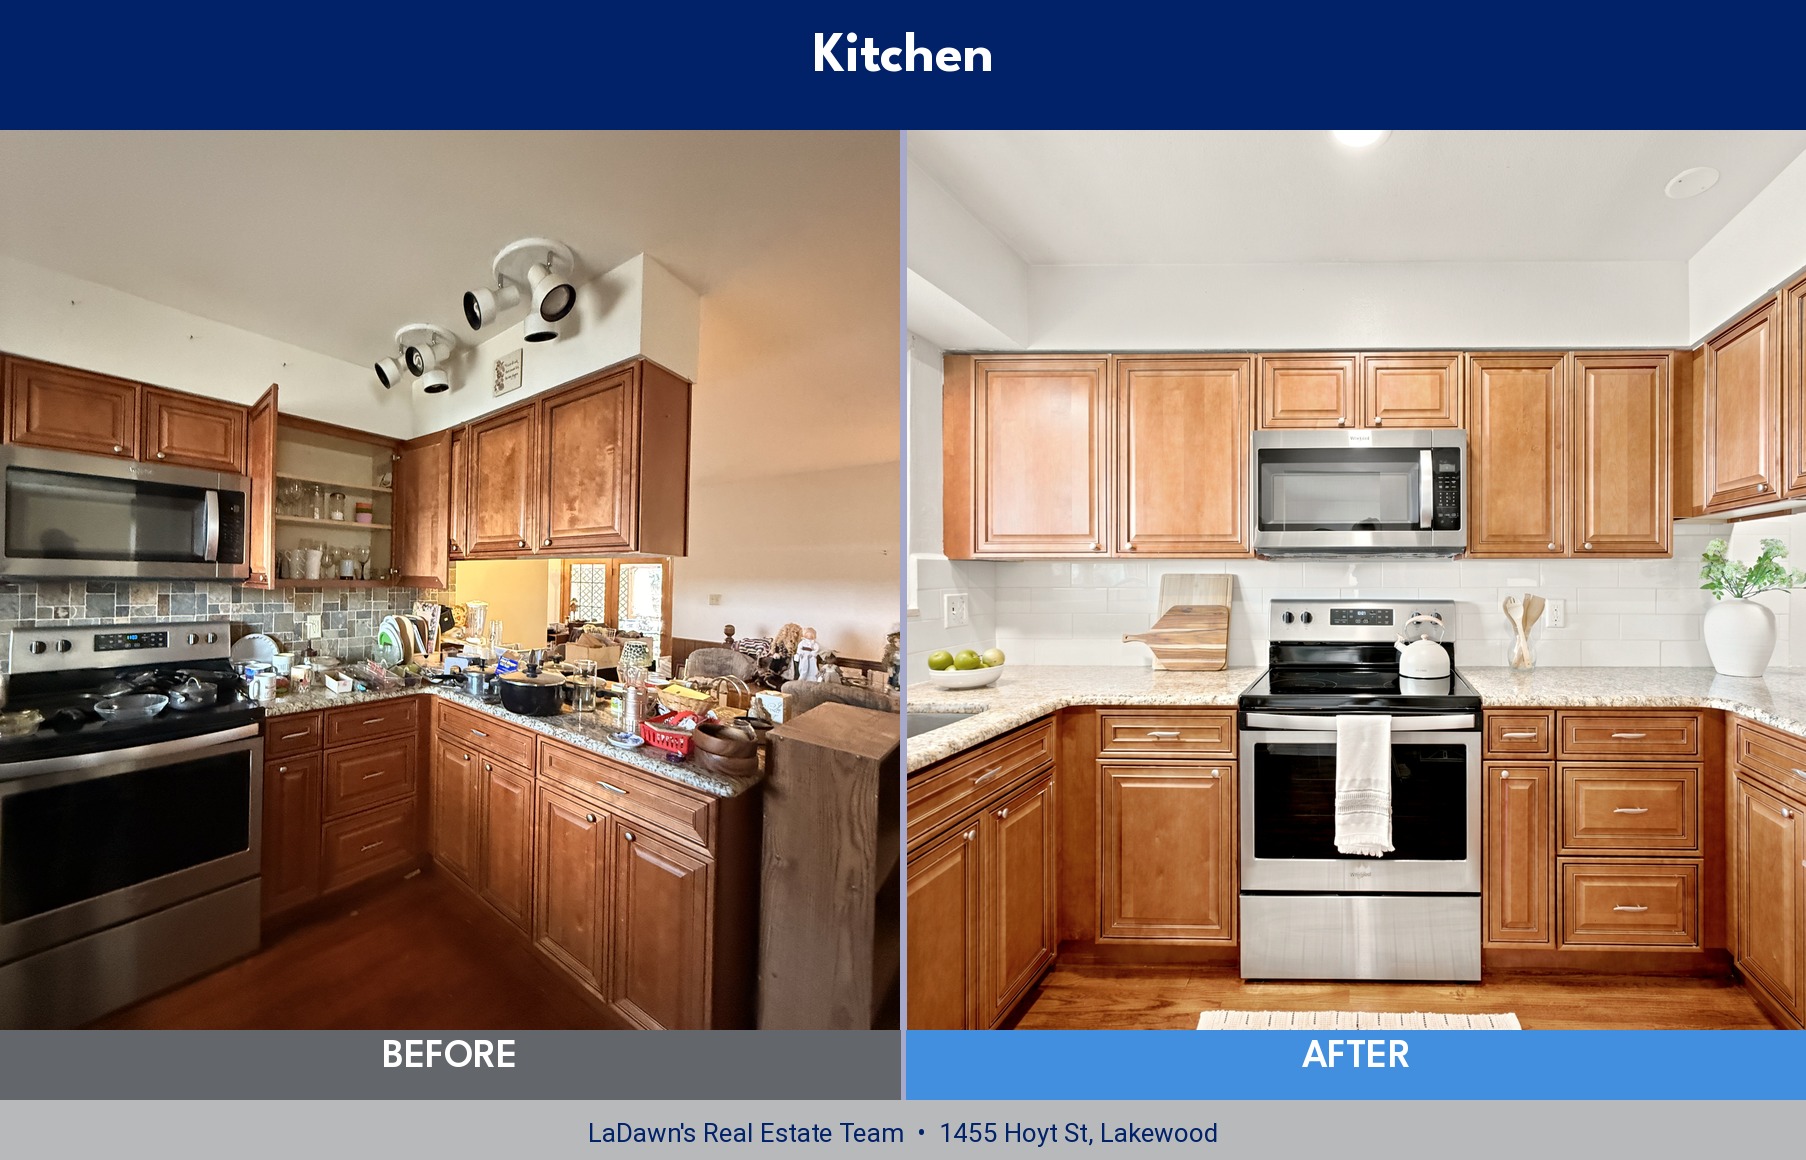
This kitchen’s biggest strengths were its beautiful cabinets, hardwood floors, and countertops. The existing backsplash was lovely, but I recommended swapping it for a classic white subway tile – an inexpensive change that added light and reflection, making the whole kitchen feel brighter and more open. The lighting worked well for this homeowner’s day-to-day, but I recommended swapping in can lights, another inexpensive way to brighten the space and round out the updated look. Staging: I chose a blond wood counter stool and a neutral cream rug to help the kitchen’s cherry floor feel cohesive with the honey-blond stain running through the halls and bedrooms.
Living Room Before & After 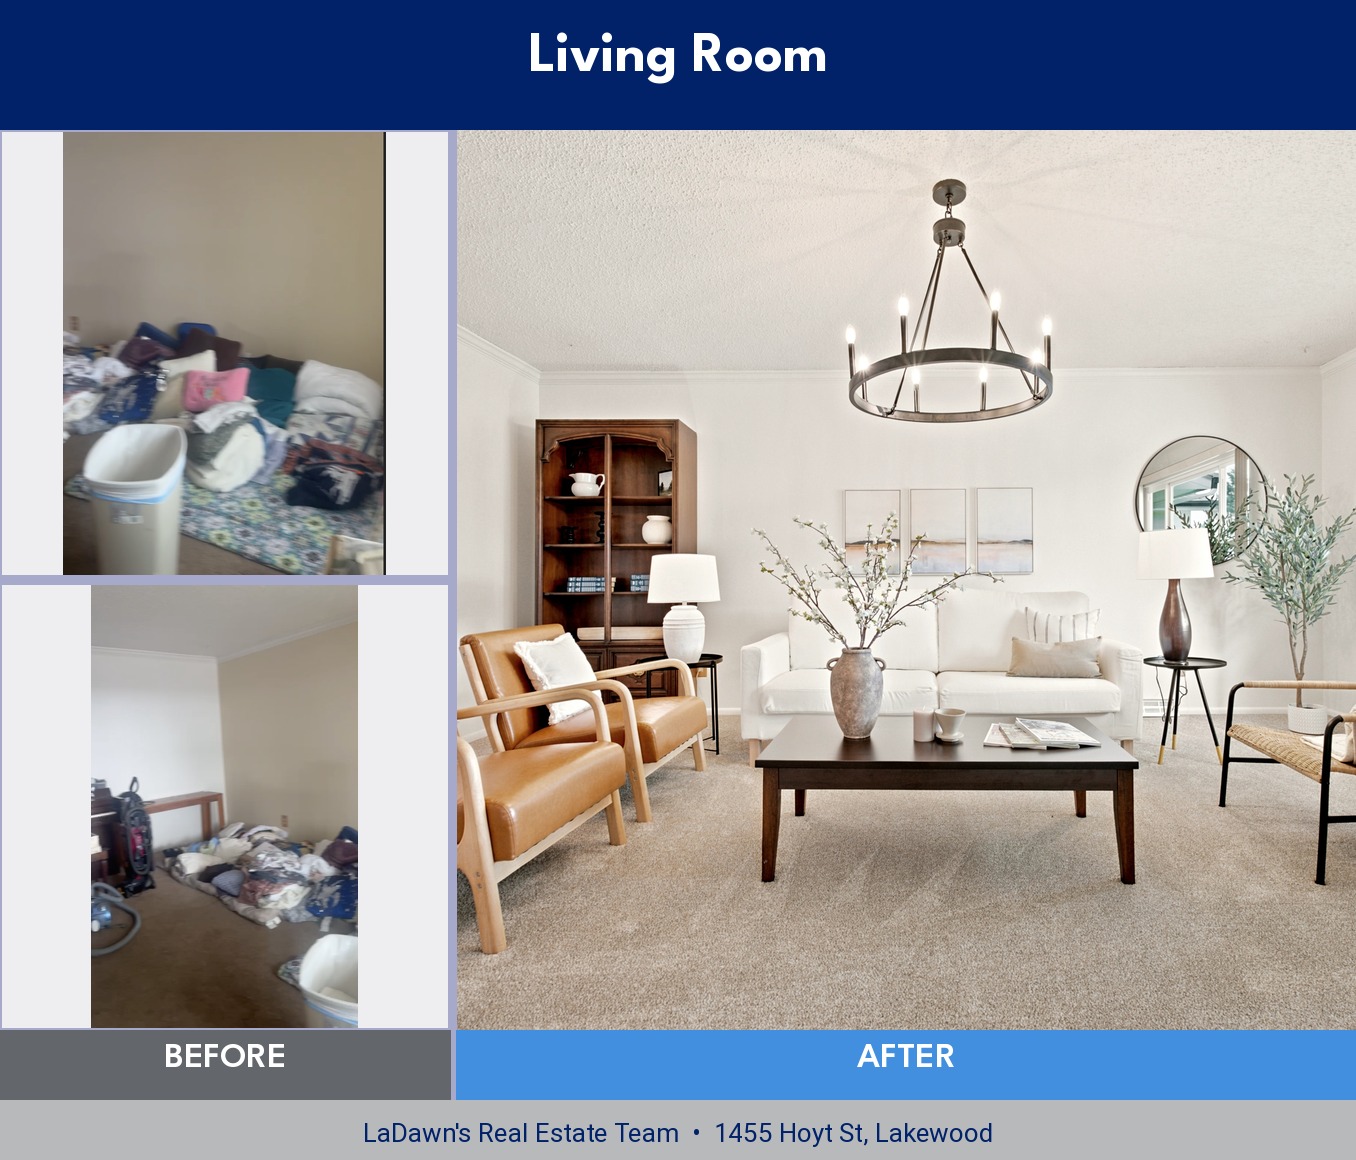 The living room has a beautiful, large window framing a view of a mature tree and a tree-lined Lakewood street. Homes built in this era often didn’t include ceiling lighting, and I wanted to create a wow moment right when people walked in, so I chose statement lighting – it’s one of the best ways to get emotional impact and elevate a space for the money. We replaced the older carpet with a mid-tone speckled carpet with hints of cream that would coordinate with the cherry cabinets visible from the living room. The window coverings weren’t new, but they were a great neutral, and window coverings can be a significant expense for a new owner. With the rest of the updates in place, they blended right in and became a cost-saving bonus for whoever buys the home next. We repainted the walls- and, by using a neutral cream found in the kitchen (Behr’s Swiss Coffee), we were able to repaint the areas that needed it and blend right in with the rooms that didn’t. Staging: I wanted an immediate focal point right when you walk in, so I flanked the sofa with two darker pieces – a mirror on one side and a beautiful wood cabinet I actually purchased from the sellers’ estate sale. The eye naturally moves toward darker pieces, which helps keep it moving through the room. And I will never turn down the chance to style a bookshelf.
Dining Room
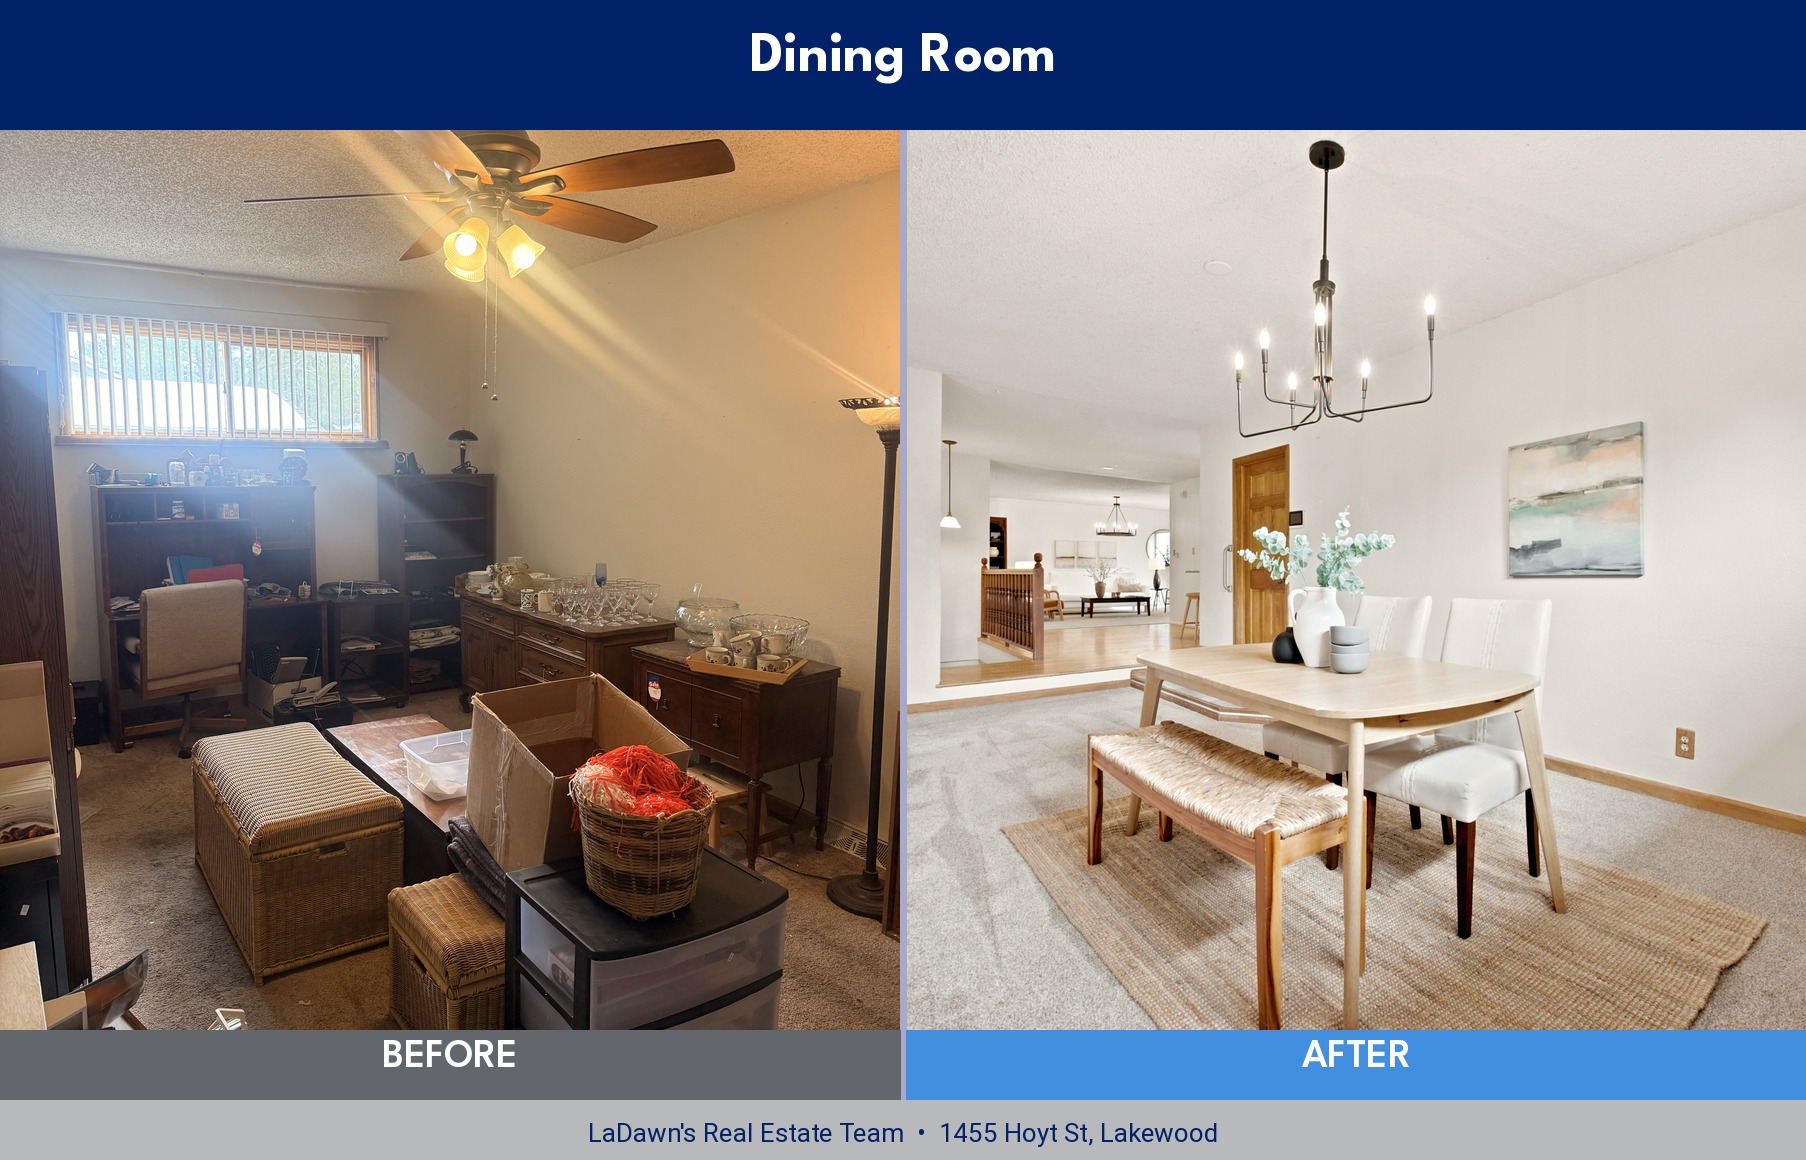
The dining room opens through a large sliding glass door to a spacious covered patio – a great spot for entertaining or for enjoying some quiet time under another beautiful mature tree. (Mature trees are special, and yes, I’ll keep saying it – new-build neighborhoods just don’t have them, and you can’t add one overnight.) In this room, I wanted to keep a clean flow from the garage and kitchen through to the patio. The existing light fixture sat too low to leave the table off-center, so we moved it and swapped in a simple, modern fixture that matched the finish of the living room light – since the open layout lets you see both, I wanted everything to feel cohesive. Staging: I wanted to draw the eye toward the patio and backyard, so I used yellow alongside black and white – a classic combination that brightens a space and adds a pop of energy while pulling the eye outward toward all that usable space. I kept the dining room simple on purpose: it shows the space is large enough for entertaining, while leaving enough room to breathe during a busy open house. Over-furnishing a room like this can make it feel smaller than it really is.
Bedrooms
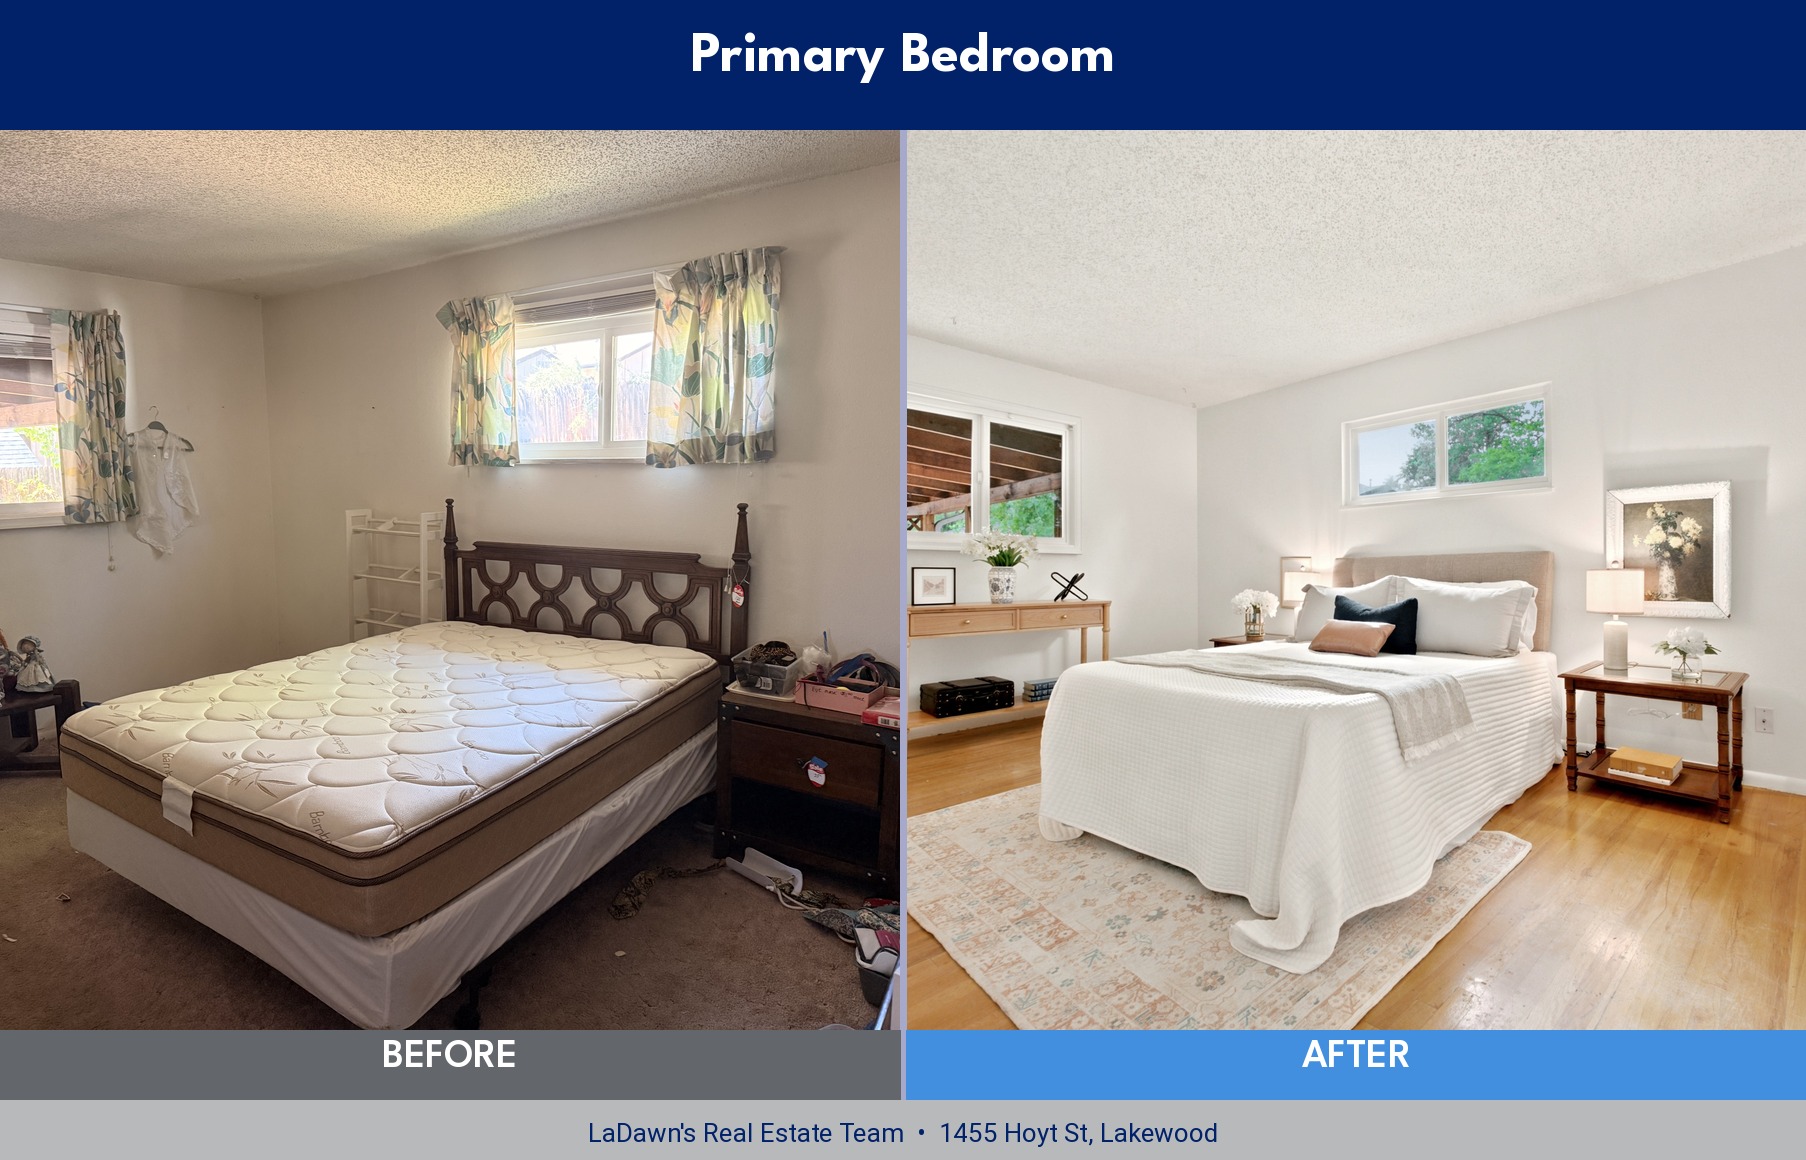
The best feature in these rooms is the charm and character of the original wood floors. Two of the bedrooms already had the carpet removed, so we pulled it from the rest. Refinishing the wood wasn’t in the budget, and for this home and price point, it wasn’t necessary – I actually love the character that comes with an older wood floor for myself. (Pristine floors just mean my kids and dogs – okay, and probably me too – will be the ones to scuff them up eventually.) We removed the wallpaper for an instant update, and repaired and repainted the doors, which fit the budget well and completed the “move in ready” level we were striving for.
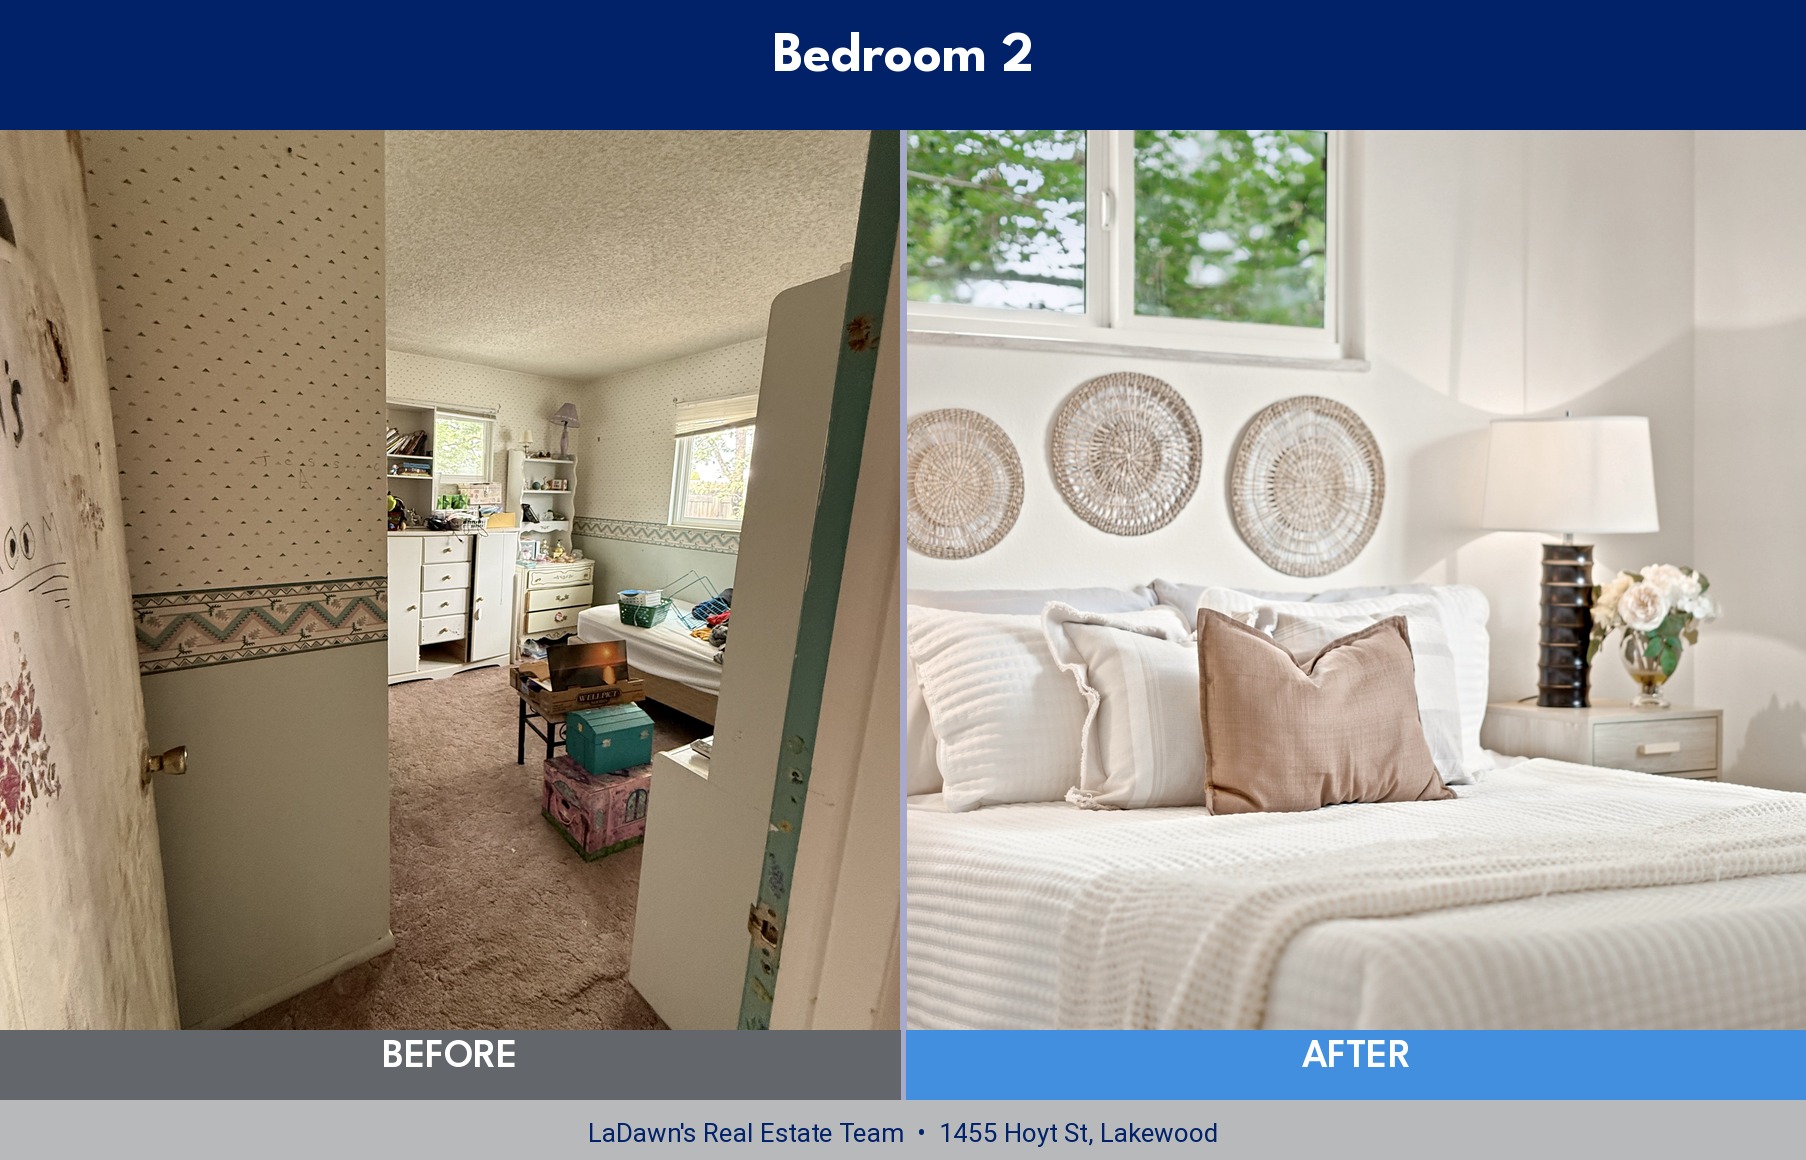
I love black as an accent color, but we painted over the existing black since it had been hand-painted and the edges showed it – and there’s almost nothing like a fresh coat of paint to make a home feel move-in ready for its next owner. Staging: I like to keep bedrooms fairly simple, but I make sure buyers get an immediate sense of scale. Since we already had three bedrooms staged, I set up the last one as a home office – remote work is more popular than ever.
Upstairs Bathrooms
These bathrooms already had newer vanities and tile, so I recommended just a fresh coat of paint. In the primary bath, we also replaced the lighting and mirror to update the feel and center everything above the vanity.
Basement
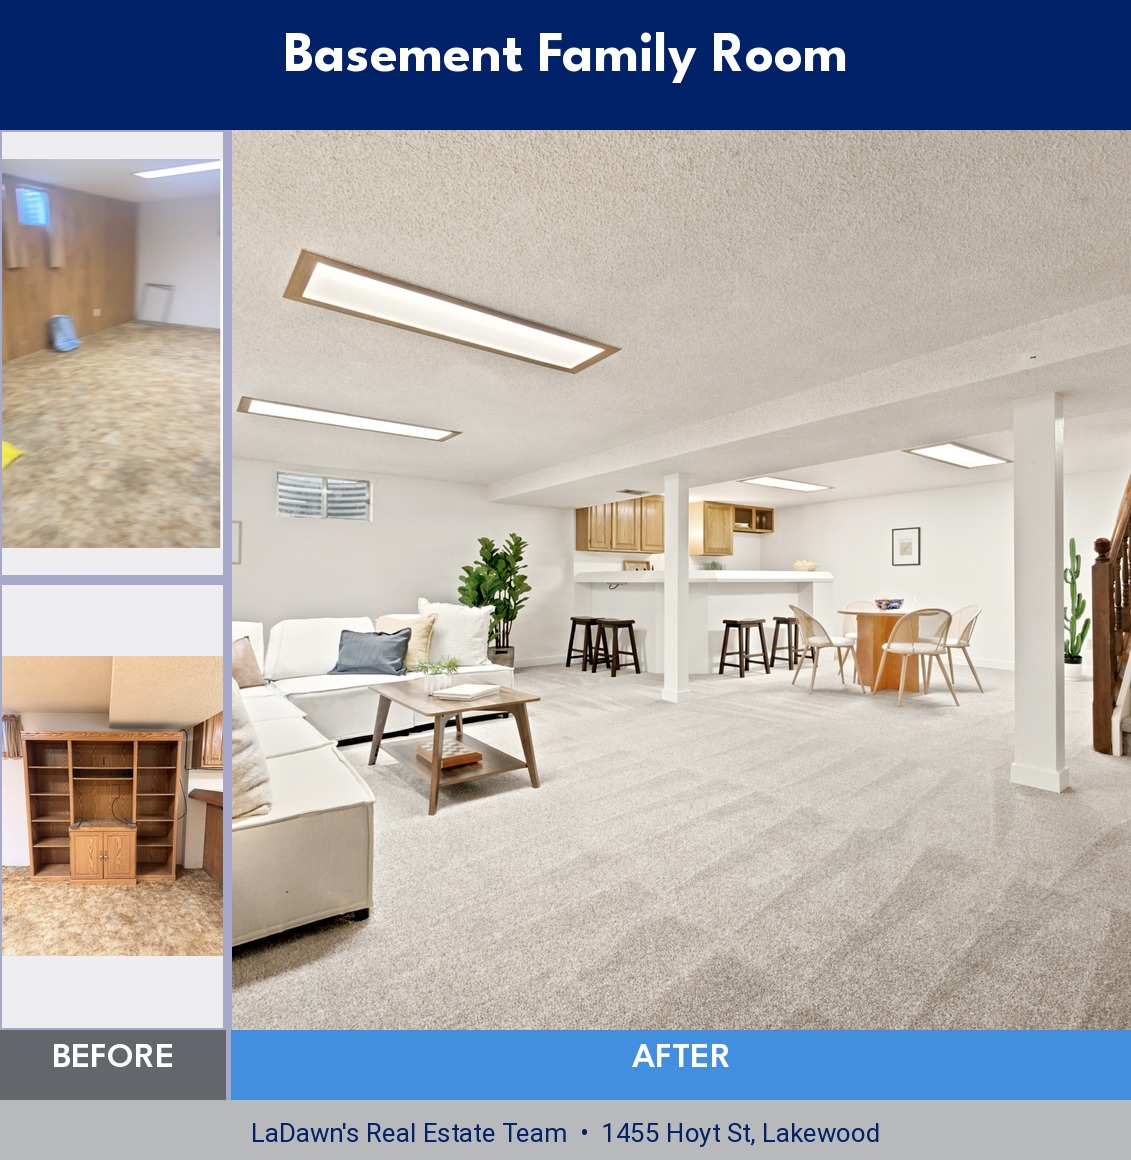
The basement added a great deal of finished square footage, including a wet bar, an updated bathroom, and an additional bedroom. Most of the original finishes were still in place – the carpet and wall paneling. That can create a couple of challenges for buyers: it’s hard to picture the possibilities, and remodeling can feel like a big lift, both in cost and hassle. Sellers typically see a lower price per square foot on a basement that’s original or unfinished. I recommended carrying the same carpet up from the main level – a practical, photo-friendly, mid-tone speckled carpet that’s forgiving of everyday wear, and it kept the whole home feeling cohesive. I went back and forth on painting the wood paneling – buyers are increasingly drawn to natural wood and retro character – but ultimately painted it since it was a faux wood rather than a natural one. (I’ll rarely paint real wood!) We got very positive feedback during the open house about the basement, so it was a great success. Staging: I like to use bright pops of color in the basement because basements tend to get less light.
Curb Appeal
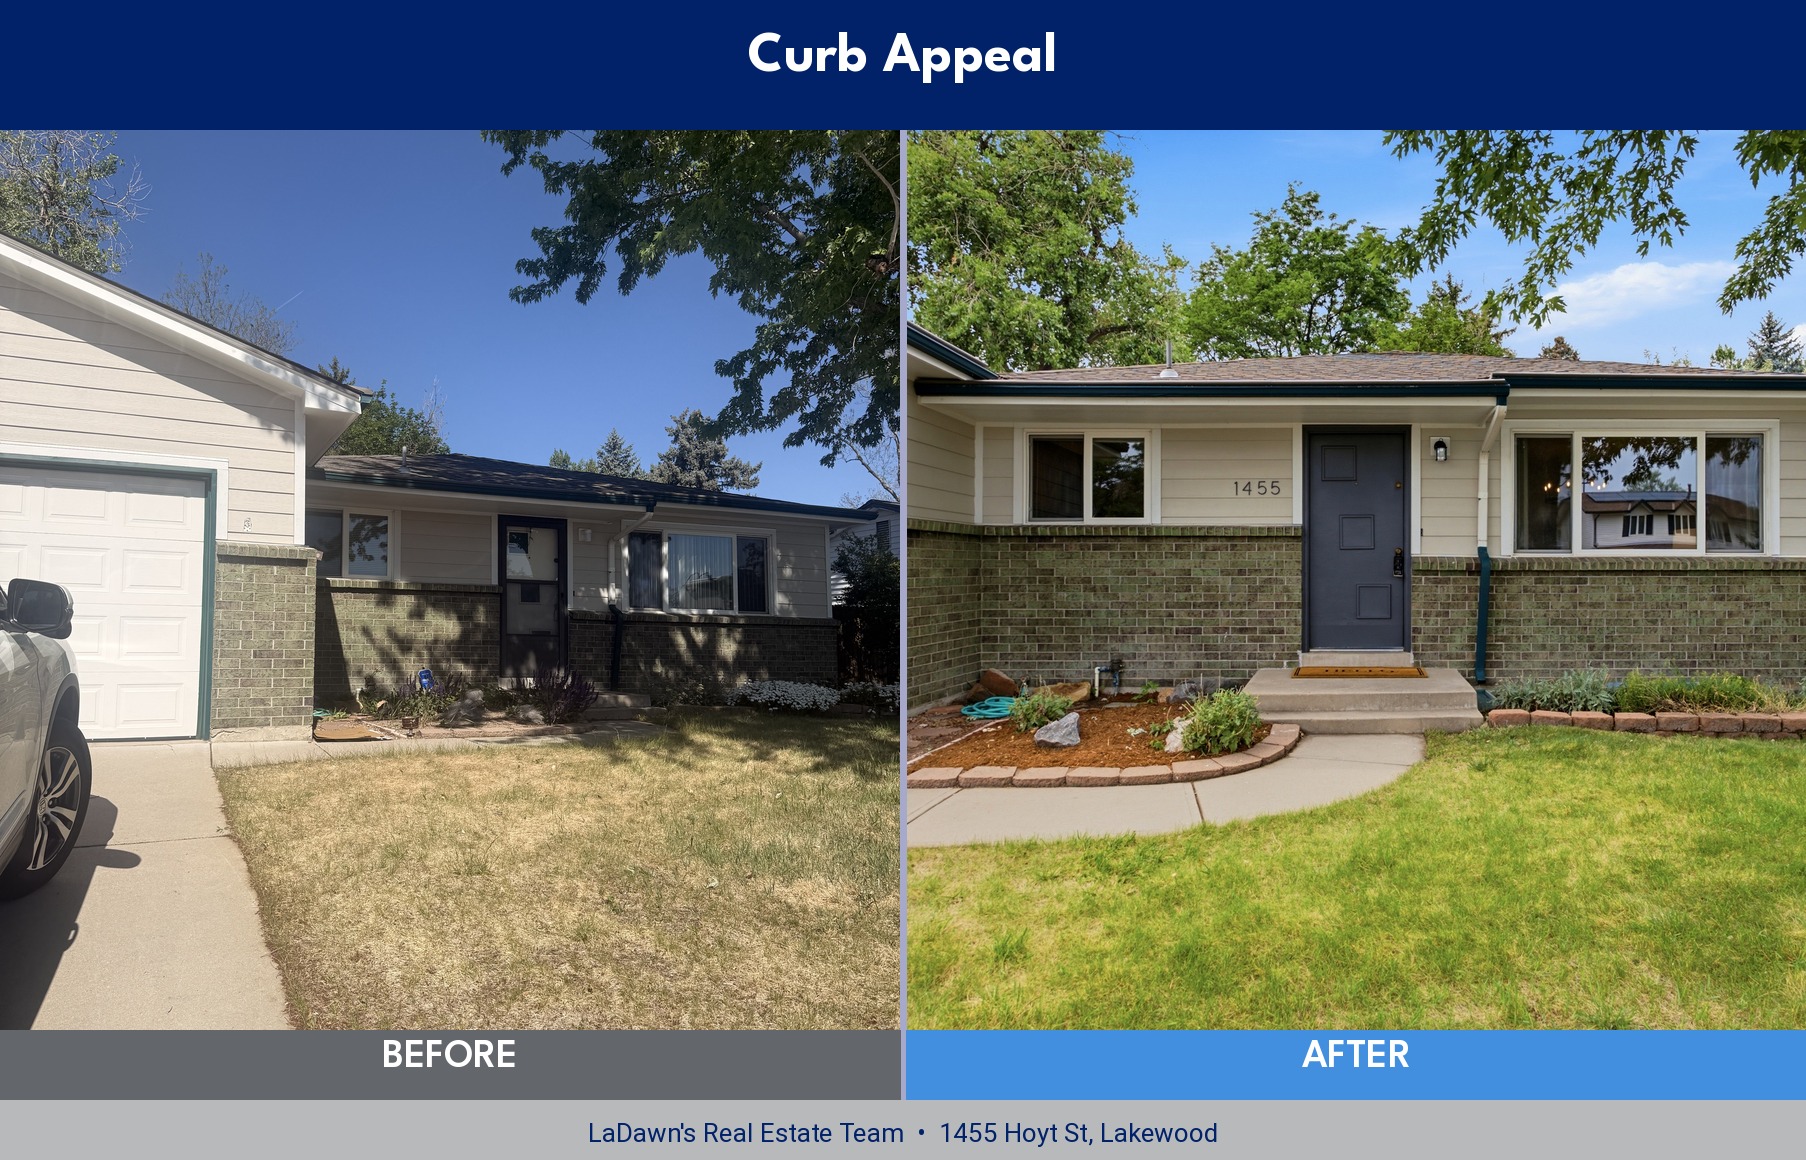
Curb appeal is one of the most important parts of selling a home – it’s the first impression, like a strong handshake versus a weak one. This home already had beautiful flowers and mature trees working in its favor, so we added a fresh welcome mat, modern house numbers, a modern paint color (Peppercorn by Sherwin-Williams, which looks great against the green brick and cream siding), and fresh mulch to make it all pop.
Why This Worked
- Data-backed strategy – every recommendation was based on comps, hyperlocal market data, and national trends, not guesswork.
- 12+ years of local market expertise – LaDawn’s read on what buyers notice shaped every decision.
- A trusted contractor network – vetted quotes and reliable scheduling kept cost and timeline predictable.
- Hands-on project management and staging – from fixtures to furniture placement, Dana managed every detail personally, so our clients can go about their busy lives.
- Fast turnaround – 10 days from funding to a fully staged, market-ready home.
- Real results – multiple offers within 3 days of listing, closed just 10 days after the offer was accepted.
It was such a great feeling to help these clients reach their goals. Whether you are looking to sell as is, or looking to maximize your profit with strategic improvements, we’d love to help you make the most of your home sale.
